Tuesday, April 27, 2010

Sweet Potato Gnocci

These were slightly tedious to make, however I made the dough and boiled the gnocci the night before I planned on serving these for dinner. This cut down on actual prep time the day of cooking. The plus side to forming the gnocci ahead of time is that they only take a few minutes to sauté before serving making this a quick and easy week night meal. The sweet potato was delicious and I really enjoyed the hint of cinnamon. I’m looking forward to cooking the other half batch in my freezer.

Adapted from Kath Eats

Ingredients
1.5 lbs sweet potatoes
3/4 tsp kosher salt
1/2 tsp cinnamon
1/4 egg substitute
1.5-2 cups whole wheat flour
1/2 tbsp canola oil
1/2 tbsp butter
1/2 tsp chopped rosemary

Directions
1. Preheat oven to 400. Bake sweet potatoes for about an hour, until a knife easily pushes through. It’s better to over bake than under.

2. Cut fully-baked potatoes lengthwise and open up to cool for 10-15 minutes.

3. Scrape skins and discard and place meat in a bowl (it will still be a little warm).

4. Add salt, cinnamon, and egg. Stir together until well-incorporated.

5. Begin adding flour. Start with probably 1 and 1/4 cups, and fold it in until well mixed. Continue adding flour until dough ball has lost 80% of its stickiness. Taste the dough to make sure it has enough salt/cinnamon.

6. Turn the dough ball out onto a floured surface. Knead it up into a tighter ball. Add additional flour as necessary to avoid sticking.

7. Divide dough into four smaller pieces and set each to the side.

8. Begin rolling each quarter into a long tube. Ideally, roll it until it’s about as thick as your finger. If the dough is breaking, just pinch it all back together. Don’t forget to use whatever flour you need.

9. Cut the tube into little nubs and set to the side.

10. Bring about 3-4qts of water to a boil. Add the gnocchi to the boiling water and boil for about 5 minutes, until they float and dance around in the boil. Don’t overcrowd the pot (you can fit an entire dough tube in one gallon).

11. [At this point, you could freeze these cooked dumplings for later use. Just spread them on a baking sheet and put in your freezer. Once frozen, consolidate into a plastic bag.]

12. When ready to consume (thaw if previously frozen), heat a pan over med-high heat. Add your canola, butter, rosemary, and gnocchi and sauté for a few minutes, until they get a golden crust.

13. Serve and enjoy!

**I made a whole batch and froze one half right away. One half batch was plenty for two people!

Monday, April 26, 2010

Menu Plans 04-26-10


Sunday - Chicken and Steak Fajitas, Chips and Salsa, Salad
Monday - Smoked Turkey Sausage, Sweet Potato Gnocci, Salad
Tuesday
- Chili Garlic Shrimp over Pasta, Salad
Wednesday
- Asian Turkey Meatballs, Cous Cous, Roasted Okra
Thursday - Trivia @ Smokey Bones
Friday - TBD

**Check out orgjunkie.com for some other great menus!

Restaurant Review: The Ravenous Pig

Bryan and I had heard and read fabulous reviews about The Ravenous Pig so we knew we wanted to try it eventually. It’s a bit pricier than your average dinner out so we waited for a special occasion to make a reservation. My birthday was this month, so it seemed like the perfect opportunity. Bryan called on Wednesday to make Saturday night reservations and all that was available was 9 pm. (Note to self: Call at least a week in advance for weekend reservations!)

I love the concept of The Ravenous Pig. It’s owned and operated by James and Julie Petrakis, James is the chef and Julie does the desserts. They offer a menu that changes daily based on what’s in season and availability. Our server explained that whenever possible they try to source organic ingredients and support local suppliers.

We arrived about 30 minutes prior to our reservation to enjoy a drink at the bar. We let the hostess know we were there and she said she would find us when our table was ready. The entire restaurant and bar was PACKED, but we managed to find one empty seat at the bar. Once we sat down, we browsed the wine and beer menu. They only carry micro brews so we decided to try out some of the beers. We both started with the Southhampton Double White Ale. A yummy wheat beer that was perfect for my taste. We also enjoyed a bowl (and a half) of some quite delicious caramel corn.


After Bryan finished his first beer, he tried the Erie Railbender. This one tasted like cranberries. Bryan wasn’t the biggest fan but he managed to finish it (no sense in wasting a beer!). Shortly after Bryan ordered his second beer, our table was ready so we closed our bar tab and followed the hostess.


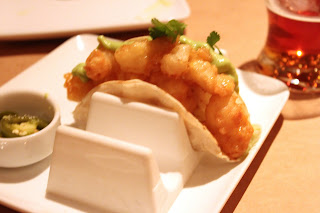
We had begun to browse the menu at the bar as well as check out some of the goods people around us ordered but there are just so many options, we wanted to try EVERYTHING! We decided to start with the Lobster Tacos.

They looked and tasted absolutely delicious. The lobster chunks were pretty big, but we were slightly disappointed they were lightly fried. The avocado cream and cabbage complemented the lobster. We really enjoyed these, however will probably not order again since they were fried.

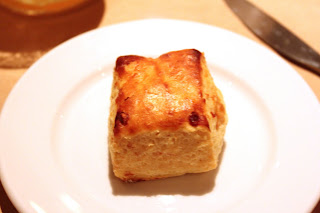
We also ordered the House Made Gruyere Biscuits. The cheese was quite strong. They were good, but I don’t feel the need to try them again.


I decided to start with the Gatherer Salad.


Yum! Everything about this salad was delicious. I loved the crunchy pistachios and the plentiful chunks of avocados. All the greens tasted incredibly fresh. I can’t wait to try some of their other wonderful salads.

For our main course, I went with a half order of the Spring Carbonara Pasta. I normally would have not selected a dish that typically has a heavy cream sauce like alfredo, however our server informed us that they don’t use cream in their restaurant. To create the sauce, they use egg and lemon juice. This sold me!

I could definitely taste the lemon and the porchetta chunks were huge! There was no shortage of meat in this dish. The half portion was the perfect size paired with the salad. I even ate (some) of the peas, which, if you know me, is a REALLY BIG DEAL!

Bryan easily enjoyed the star dish of the evening. He ordered the Niman Ranch Lamb Leg.


TO DIE FOR. Everything about this dish was AMAZING. The lamb was incredibly tender and flavorful. I would order this again in a heartbeat. Bryan raved multiple times during this course about how this was one of the best meals he’s ever had.


Finally, since it was my birthday celebration, we ended the evening with some Bread Pudding.

This did not disappoint either. The bread pudding was warm and toasty and the malt ice cream was a delicious accompaniment.

From start to finish, this meal was fabulous. We could definitely tell how fresh all the ingredients were and that everything was made with thought and care. I see another evening out to The Ravenous Pig in our near future. Can’t wait!

Tuesday, April 20, 2010

Peppery Pasta with Arugula and Shrimp

This was fairly easy to make and didn’t involve too much prep work. I was able to have this entire dish ready in the time it took to boil the water and cook the pasta; less than 20 minutes. In case you couldn’t tell, I’m a fan of quick, easy and delicious weeknight dinners!

I enjoyed the bite of the arugula as well as the refreshing lemon flavor in the sauce. All around this was a good dish that I can definitely see being made again.

Adapted from Cooking Light

Ingredients
1 tbsp minced fresh garlic, divided
1 1/4 tsp black pepper, divided
1/2 tsp salt, divided
1 (5-ounce) package fresh baby arugula
4 quarts water
8 oz. uncooked whole wheat In capasta
1 tsp olive oil
8 oz. peeled and deveined medium shrimp, cut in half horizontally
2 tbsp minced shallots
3/4 cup fat-free, less-sodium chicken broth
2 tbsp lemon juice
1 tbsp butter
Optional - 1/2 cup (2 ounces) shaved fresh Romano cheese

Directions
1. Combine 1 teaspoon garlic, 1 teaspoon pepper, 1/4 teaspoon salt, and arugula in a large bowl; toss well.

2. Cook pasta according to package directions; drain. Add hot pasta to arugula mixture, and toss well until arugula wilts.

3. Heat oil in a large skillet over medium-high heat. Add shrimp, remaining 1/4 teaspoon salt, and remaining 1/4 teaspoon pepper; sauté 1 minute.

4. Add remaining 1 teaspoon garlic and shallots; sauté 1 minute or until shrimp are done. Remove shrimp from pan.

5. Add broth and juice to pan, scraping pan to loosen browned bits; cook 5 minutes or until liquid is reduced by half.

6. Return shrimp to pan. Remove from heat; stir in butter.

7. Serve shrimp mixture over pasta. Top with cheese if desired.

The Facts
4 Servings

Monday, April 19, 2010

Menu Plans 04-19-10


Tuesday - Crockpot Chicken Tacos, Rice, Salad

Wednesday - Grilled Filet Mignon, Roasted Sweet Potatoes, Salad

Thursday - Trivia @ Smokey Bones

Friday - Belated Birthday Dinner Out :)
Check out orgjunkie.com for some other great menus!

Wednesday, April 14, 2010

Sweet and Sour Chicken

This meal was SUPER tasty! The flavor was great and was very similar to take out. The pineapple added some sweetness to the dish and complemented the chicken well. We enjoyed this over brown rice with a salad on the side. I definitely plan on making this meal again.

Adapted from Kelly’s Kitch

Ingredients
1 can pineapple chunks (8 oz)
1/2 cup sweet and sour sauce
1 lb boneless, skinless chicken breasts (cut into 1-inch pieces)
1 tbsp soy sauce
2 tsp olive oil
1 medium red pepper, sliced
1 medium carrot, thinly sliced

Directions
1. Drain pineapple, reserving 2 tbsp juice. In a small bowl, stir together pineapple juice and sweet and sour sauce. In a medium bowl, toss chicken with soy sauce and set aside.

2. In a medium skillet, heat oil on medium-high heat. Add peppers and carrots and cook for 4 minutes until vegetables are crisp-tender. Remove from skillet and set aside.

3. Using a slotted spoon, add chicken to pan. Cook and stir for 3-4 minutes or until chicken is no longer pink. Add sweet and sour mixture, vegetables and pineapple chunks. Heat thoroughly and serve over rice.

The Facts
4 Servings

Monday, April 12, 2010

Menu Plans 04-12-10

Monday - Sweet and Sour Chicken, Brown Rice, Sauteed Greens (from our CSA)
Tuesday - Grilled Chicken, Roasted Okra, Roasted Sweet Potatoes
Wednesday - Peppery Pasta with Arugula and Shrimp, Salad
Thursday - Trivia @ Smokey Bones?
Friday - I'll be out of town for the weekend!

*Check out some other great menu's at orgjunkie.com

Wednesday, April 7, 2010

Sweet and Spicy Shrimp

Wow, this entire meal came together in 15 minutes. No joke. The shrimp themselves probably took 8 minutes, max. I love a fast delicious meal! The variety of seasoning and sauces gave this dish an awesome flavor. I definitely plan on putting this on the menu when in need of a quick home cooked meal.

Adapted from Stephanie Cooks

Ingredients
1 lb. medium shrimp, 21-25 count, peeled and deveined
1/3 tsp Cajun seasoning
1 tbsp ketchup
1 tbsp hoisin sauce
1 tbsp worcestershire sauce
Cooking spray

Directions
1. Pat shrimp dry and sprinkle with the Cajun seasoning.

2. Spray a large nonstick skillet with cooking spray and heat it over medium heat.

3. Add the shrimp, allow them to cook through on one side and then flip.

4. Once the shrimp are cooked add the ketchup, hoisin, and A1. Stir well until combined.

5. Lower the heat to low and allow the sauce to heat through, about 1 minute.

6. Serve hot.

The Facts
4 Servings

Tuesday, April 6, 2010

Chicken Gorgonzola Pasta

This dish had a great Mediterranean flavor to it. I think with some onion and kalamata olives it would be like dining in Italy or Greece. I definitely plan on adding those additional ingredients the next time this recipe appears on my menu. I lighted up the original version by reducing the amount of oil and butter called for; I also substituted fat free milk for heavy cream and used reduced fat cheese. I don’t think any of these alterations affected the taste.

Adapted from The Chef In My Head

Ingredients
2 oz sun-dried tomatoes, chopped
1 lb chicken breasts, skinless, sliced in 3/4 inch wide strips
8 oz whole wheat fettuccine pasta, cooked according to package directions
2 tsp olive oil
1 tbsp butter
4 garlic cloves, finely chopped
8 oz baby bella mushrooms, sliced
1/2 cup canned artichoke hearts, drained & quartered
2 tbsp lemon juice
2 tsp dried tarragon
salt & pepper, to taste
1/2 cup dry white wine
1/2 cup chicken broth
2 oz crumbled reduced fat Gorgonzola cheese
1/4 cup fat free milk
*Parmesan, shredded for garnish if desired

Directions
1. Heat olive oil in heavy large skillet over medium-high heat. Add chicken to skillet and sauté until cooked through, about 3 minutes per side. Transfer chicken to plate, do not clean skillet.

2. Cook pasta until just tender, drain.

3. Meanwhile, reheat skillet to medium-high heat and add butter. Add garlic; sauté until tender.

4. Add sun-dried tomatoes, mushrooms, artichoke hearts, tarragon and salt & pepper; sauté for about 2-3 minutes.

5. Add lemon juice, white wine and chicken stock. Return chicken to pan together with vegetables, cover and reduce heat to medium, for approximately 10-15 minutes.

6. Uncover, add Gorgonzola and milk, stir to combine and heat through.

7. Serve over pasta and garnish with Parmesan. Enjoy!

The Facts
4 Servings
*Does not include Parmesan

Monday, April 5, 2010

Bacon Wrapped Shrimp and Mango Stuffed Jalapeños

These are AMAZING. Seriously, YUM! Bryan and I decided last week that these would be fun to make for an Easter appetizer. We browsed recipes, but in the end decided to make up our own based off the various ones we read. The BBQ sauce was a last second addition by Bryan and was 100% worth it. Everyone enjoyed these and I know we’ll be making these again the next chance we get!

An Erin’s Eatery Original

Ingredients
8 jalapeños
1 mango, chopped
16 large shrimp (21-25 count, raw), tails removed
4 oz fat free cream cheese, softened
1/4 tsp cumin
dash cayenne
8 bacon slices, cut in half
BBQ Sauce

Directions
1. Preheat oven to 425. Grease a non stick jelly roll pan or use parchment paper.

2. Slice off jalapeño stems and cut in half. Use spoon to remove seeds and membranes. Set aside.

3. In a small bowl, mix cream cheese, cumin and cayenne thoroughly.

4. With a knife, spread cream cheese mixture in hollowed jalapeño halves. Top each with one shrimp and mango chunk.

5. Carefully wrap each pepper with half a bacon slice and secure with toothpick. Be sure toothpick passes through all ingredients.

6. Top with approximately 1 teaspoon of BBQ sauce.

5. Evenly space jalapeños on pan and bake for 20-25 minutes, or until bacon is crisp.

Ready for the oven!

The Facts
8 Servings
2 stuffed jalapeños each

Sunday, April 4, 2010

Menu Plans 04-05-10

Monday - Chicken Gorgonzola with Sun Dried Tomatoes, Artichokes and Mushrooms over Pasta (I didn't get to make it last week!), Salad
Tuesday - Sweet and Sour Shrimp, Brown Rice, Veggie Side
Wednesday - Grilled Filet, Roasted Red Potatoes, Salad
Thursday - Trivia @ Smokey Bones
Friday - Pizza and Salad

*Check out some other great menu's at orgjunkie.com